In this tutorial, we are going to create a Laravel 8 Contact Form API and will store the form data in MySQL Database.
Contact Us form is a commonly used feature required by almost every web or mobile application. In this Laravel contact form tutorial, we will learn to create a contact form API in Laravel 8, validate contact form API using Laravel built-in validation, store data in the database and send email to application admin using Gmail SMTP.
You can check the article Laravel 8 Register and Login Rest API Using Passport
The following are the steps to create Laravel 8 Contact Form API:
- Laravel 8 Installation
- Database connection
- SMTP Email Configuration
- Model and Contact table Creation Using Migrations
- Controller Creation And Laravel Contact Form Validation
- Setup Email Template
- API Route Creation
- Send Email
1. Laravel 8 Installation
To new set up of Laravel8, run the below command:
| 1 | composer create-project --prefer-dist laravel/laravel Laravel-8-Contact-Form-API |
2. Database Connection
Got to your installed Laravel project and open the .env file and setup database:
| 1 2 3 4 5 6 | DB_CONNECTION=mysql DB_HOST=127.0.0.1 DB_PORT=3306 DB_DATABASE=laravel DB_USERNAME=root DB_PASSWORD= |
3. SMTP Email Configuration
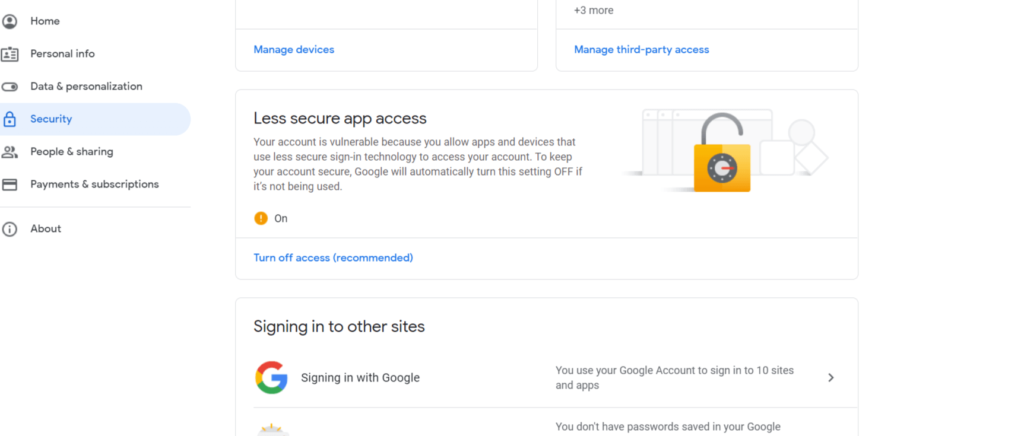
First, you need to change the Gmail security setting. Logged in to Gmail and Go to Manage Your Google Account-> Security and change like below:

Now open the .env file and update like below:
| 1 2 3 4 5 6 | MAIL_MAILER=smtp MAIL_HOST=smtp.gmail.com MAIL_PORT=465 MAIL_USERNAME=Gmail User Name MAIL_PASSWORD=Gmail Password MAIL_ENCRYPTION=ssl |
4. Model and Contact table Creation Using Migrations
Run the below command to create a model and Migration file.
| 1 | php artisan make:model Contact -m |
Open database/migrations/your_timestamp_create_contacts_table.php file and add the values for the contact form that you have to store in the MySQL database.
| 1 2 3 4 5 6 7 8 9 10 11 12 13 14 15 16 17 18 19 20 21 22 23 24 25 26 27 28 29 30 31 32 33 34 35 | <?php use Illuminate\Database\Migrations\Migration; use Illuminate\Database\Schema\Blueprint; use Illuminate\Support\Facades\Schema; class CreateContactsTable extends Migration { /** * Run the migrations. * * @return void */ public function up() { Schema::create('contacts', function (Blueprint $table) { $table->id(); $table->string('name'); $table->string('email'); $table->string('subject'); $table->text('message'); $table->timestamps(); }); } /** * Reverse the migrations. * * @return void */ public function down() { Schema::dropIfExists('contacts'); } } |
Open the app/Models/Contact.php file and add the following code.
| 1 2 3 4 5 6 7 8 9 10 11 12 | <?php namespace App\Models; use Illuminate\Database\Eloquent\Factories\HasFactory; use Illuminate\Database\Eloquent\Model; class Contact extends Model { use HasFactory; public $fillable = ['name', 'email', 'subject', 'message']; } |
First, using the below instruction, run the migration. If the command is ended, go to the database and check the name, email, subject, and message fields of the contacts table.
| 1 | php artisan migrate |
5. Controller Creation And Laravel Contact Form Validation
Run the below command to create a controller:
| 1 | php artisan make:controller Api\ContactFormController |
And add the below code:
| 1 2 3 4 5 6 7 8 9 10 11 12 13 14 15 16 17 18 19 20 21 22 23 24 25 26 27 28 29 30 31 32 33 34 35 36 37 38 39 40 | <?php namespace App\Http\Controllers\Api; use App\Http\Controllers\Controller; use Illuminate\Http\Request; use Validator; use App\Models\Contact; class ContactFormController extends Controller { // Store Contact Form data public function ContactForm(Request $request) { // Form validation $validator = Validator::make($request->all(), [ 'name' => 'required', 'email' => 'required|email', 'subject'=>'required', 'message' => 'required' ]); if ($validator->fails()) { return response()->json(['error'=>$validator->errors()], 401); } // Store data in database Contact::create($request->all()); // Send mail to Application Admin \Mail::send('emails.contactemail', array( 'name' => $request->get('name'), 'email' => $request->get('email'), 'subject' => $request->get('subject'), 'bodyMessage' => $request->get('message'), ), function($message) use ($request){ $message->from($request->email); $message->to('troposal.com@gmail.com', 'Admin')->subject($request->get('subject')); }); return response()->json(['success' => 'The email has been sent.']); } } |
6. Setup Email Template
Create an email template resources/emails/contactemail.blade.php and add the below code:
| 1 2 3 4 5 6 7 8 9 10 11 12 | <h2>Hello Admin</h2> <br><br> You have got an email from Contact Form <br><br> User details: <br><br> Name: {{ $name }} <br> Email: {{ $email }} <br> Subject: {{ $subject }} <br> Message: {{ $bodyMessage }} <br><br> Thanks |
7. API Route Creation
Open routes/api.php and add the below code
| 1 2 3 4 5 6 7 8 9 10 11 12 13 14 15 16 17 18 | <?php use Illuminate\Http\Request; use Illuminate\Support\Facades\Route; use App\Http\Controllers\Api\ContactFormController; /* |-------------------------------------------------------------------------- | API Routes |-------------------------------------------------------------------------- | | Here is where you can register API routes for your application. These | routes are loaded by the RouteServiceProvider within a group which | is assigned the "api" middleware group. Enjoy building your API! | */ Route::post('contact', [ContactFormController::class, 'ContactForm']); |
8. Send Email
Now, the contact form API setup has been completed. You can validate the form data, store the data in the database and send the contact details to the application admin.
Run the below command to run the application:
| 1 | php artisan serve |
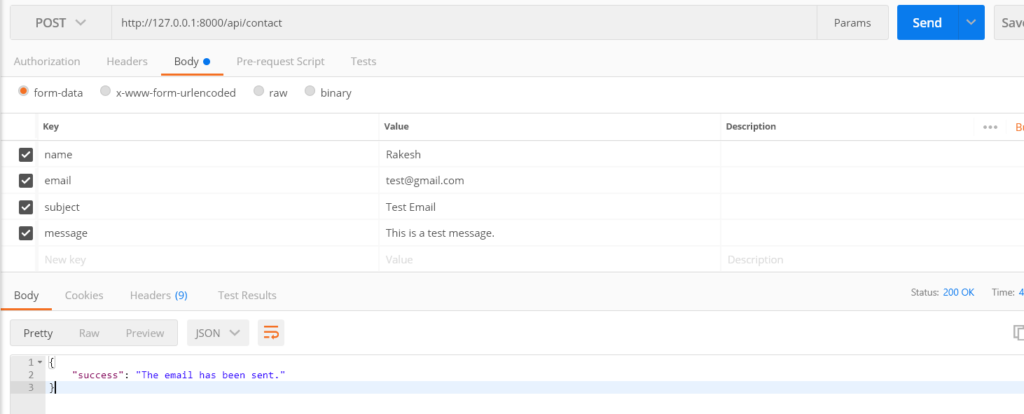
Open the postman and run the post API(http://127.0.0.1:8000/api/contact) and pass the name, email, subject, and message in the body like below:

Conclusion:
In this tutorial, we have learned Laravel 8 Contact Form Rest API. We have set up Laravel, Created Contact Form API, Validate the form post data, and stored it in the Database. We have tested the Contact Form Rest API using Postman.
You can download the code from Github.

